Showing posts with label Samsung Galaxy Y. Show all posts

Sunday, 19 January 2014

Update Samsung Galaxy Y GT-S5360 to Android 4.4 KitKat


Hello readers as you know that Google  has recently released Android 4.4 KitKat and many of the devices already started receiving the update.Today we have Samsung Galaxy y GT-S5360 in the list.
We are going to show you How to Update Samsung Galaxy Y GT-S5360 to Android 4.4 KitKat.

Samsung Galaxy Y is one of the most popular device among the masses. I still remind those days in which talking tom was played in the Samsung Galaxy Y in the TVC. The specifications of the device are good enough to run most of the apps in the playstore and its still selling like hotcakes in the market. Lets see How to Update Samsung Galaxy Y GT-S5360 to Android 4.4 KitKat.
 
The update we are going to write about is not official update its makes your device look alike the latest Google Android 4.4 Kitkat. By installing this Rom you will lose your warranty. Follow the steps carefully this procedure is only meant to update Samsung Galaxy Y GT-S5360 to Android 4.4 KitKat and may not work on any other device. Don’t try to do on other devices this will make the devices not work causing them a hard brick which is hard to recover. Proceed with caution.

Prerequisites to Update Samsung Galaxy Y GT-S5360 to Android 4.4 KitKat

  1. Make sure your device Model is GT-S5360.
  2. Charge the device upto 80%.
  3. Make sure you have rooted the Device and Installed a custom recovery like ClockWorkMod on it. If your device is not rooted, have a look at How to Root Samsung Galaxy Y gt-s5360.
  4. Enable USB Debugging on your device. During the process you will loss all the data present in your device. Kindly back up your device.
  5. Download CWM RECOVERY, CM Kernel & Android 4.4 Kitkat rom.
Now you are good to go to start updating your Samsung Galaxy Y GT-S5360 follow the below steps carefully.

Procedure to Update Samsung Galaxy Y GT-S5360 to Android 4.4 KitKat

  1. Copy all the files you have downloaded from above links to your SD Card.
  2. Now Turn off your mobile and switch it on using Volume up+power+Home button.
  3. The above combination takes you to a recovery screen.
  4. Now select update from SD Card and select CWM.
  5. Now you are in CWM recovery screen. Select Install from SD card.
  6. Select CyanogenMod.zip from the list after installing select reboot recovery.
  7. Now its time to format system, Cache & Dalvik Cache.
  8. After that select Install from sd card and Select Android 4.4 Kitkat rom.
  9. After installing the Rom do a factory reset from the recovery menu itself.

Wednesday, 21 August 2013

Root Samsung Galaxy Y

What is Rooting?
Rooting is a process by which  you can access system files of your Android OS. After rooting Samsung Galaxy Y, you can install applications which require access to these system files. It becomes necessary if you wish to customize your Android device and also install custom ROMs like CyanogenMod ROMs which are highly customizable and have a better performance than the
stock ROMs.

Why Should You Root Your Device?
Rooting has quite a lot of advantages. If you are a tru Geek, you would love rooting your device. A few top advantages of rooting are Rooting lets you customize your phone in a better way. Install Custom ROMs to improve the performance. Remove System apps which you do not need and hence free up space Convert the file system of current RFS to the faster ext4 file formats Convert Downloaded apps to system Apps

Why Should You Not Root Your Device?
There are not many reasons for you not to root your device except the fact that your device’s warranty gets void. Usually all manufacturers provide a warranty of one year for the devices and they do not allow one to root the device and access system files. However, Android is an open source OS and hence there exists
rooting! Also, you can unroot it later in case you wish to make use of your device’s warranty.

Precaution :
Before you root your phone, you need to back up your phone’s data. You can back up your contacts to the SD Card and to back up your Applications you can use ASTRO FILE MANAGER. In case you need to reset your phone, you can make use of the back up files to restore those applications.

Disclaimer : We are not responsible for any damage that might be caused to your device during this process though the possibility of any damage is negligible. Try this at your own risk. Also note, rooting your phone will void your warranty.

Steps to Root Samsung Galaxy Y GT-S5360
1. Download update.zip
2. Copy the downloaded file to the root of your SD Card via USB Cable or any other method according to your convenience.
3. Turn of your Samsung
Galaxy Y
4. Reboot into recover mode by pressing Home button + Volume up button and Power button for 15-20 seconds.
5. When you are in recovery mode, select “Update from SD Card”.
6. Now select Update.zip
(the zip file you downloaded in ( step 1) and execute it by pressing the home button.
7. Now your phone will be rooted after which you can select the reboot option.

ENJOY!!!

How to Increase internal phone memory of Samsung Galaxy Y S5360

Samsung Galaxy Y Young S5360 is one of the popular entry level android smartphone today. But because it is relatively cheap, it does have its limitation. One is its internal phone memory storage. Samsung Galaxy Y has only 160MB of internal storage. Here’s the good news, now you can actually increase that to make room for more apps and games. How? I’ll show you.
Here’s the thing, we are not actually gonna replace any parts of your Galaxy Y or unlock something to increase it’s internal memory. We’re going to make use of the external SD card. Below are the steps on how to increase the internal phone memory of Samsung Galaxy Y S5360.
Note: This procedure is not limited to Samsung Galaxy Y alone and it can also be done in other android smartphones. And proceed with CAUTION. If you’re not careful you will experience data loss in your Samsung Galaxy Y/android smartphone.

Try this procedure at your own risk. I will not be held responsible if you messed up and something happens to your phone

Needs to Download :
1.CWM : click here
2.Link2sd : click here

Instructions :
1. You will need to root your Samsung Galaxy Y. If your phone is still not rooted read this:
Root and Unroot Samsung Galaxy Y (Young GT-S5360)

2.Please proceed with caution and backup your data first!.

3.What we are setting out to do is to make the device recognize the external memory card as an internal memory.

3.Switch off your phone and boot up into recovery mode by pressing the following keys at the
same time; Volume up +Home button +lock button

4.Now you are in Recovery mode here Touch screen does not work use volume up and down button to scrool and home button to select.

5.Select “apply update from sd card”, then select “CWM.zip” On the screen “ClockworkMod Recovery v”, select “advanced” On the screen “Advanced and Debugging”, select “Partition SD Card” On the screen “For Ext Size”,

6.Select the size you will want your new internal memory storage to be. A max size of 1024 MB (1GB) is advised because of stability issues.

7.On the screen labelled “swap size”, select 0M Now you wait a few minutes for your SD card to be partitioned.

8.Afterwards, select “reboot recovery”, then select “reboot system now”.

9.Your phone will reboot. Now Select link2sd Choose “recreate mount script”, then select “ext3″

10.Reboot your phone. After your phone reboots, you may launch the linksd app again and move installed software to the partition you created by “linking” them.

Please note that you will not notice any increase in the size of your internal memory after this procedure when you check via your phone settings but what it does is that subsequent installations are made directly on your SD card subject to the maximum size you partitioned.

Now you have a 1GB Samsung Galaxy Y / Y Duos GT-S5360.

Sunday, 18 August 2013

ELEGENCE-Custom Rom for Galaxy Y

  • Has 23 powerful and power-efficient
  • CPU Governor
  • 5 I/O Scheduler
  • Lasts up to two days on a single charge
Basically Features:
  • Deodexed
  • Zipaligned
  • Recompressed APKs
  • Optimized APK
  • Images
  • Rooted
  • Busybox and Busybox run-parts
  • Support Apps2SD [A2SD]
 Must have Features:
  • 15 Toggles Notification Drawer
  • 6 Lockscreens from Gingerbread AOSP/
  • CM with custom app starter and gesture unlock
  • Statusbar Tweaks + Team Battery Bar
  • 4 Way Reboot Options
  • Expanded Power Men
 Unique Features:
  • No SMS Bug
  • No useless features
  • Least Branding
 Advanced Features:
  • EXT4 File System Support
  • CIFS
  • Swap Support
  • BaCeM Tweak
  • Undervolt Support
  • Firewall Support
  • Ad-blocking hosts file

Download Links :1.Elegance_Stable_Signed.zip
2.CWM.zip

Instructions: [Make sure you're on Stock ROM!]
1. Reboot into Recovery Mode
2. Wipe Data
3. Wipe Cache Partition
4. Go to Advanced=> Wipe Dalvik Cache
5. Go to Advanced=> Wipe Battery Stats
6. Install ZIP from SD Card
7. Choose ZIP from SD Card
8. Choose the ZIP File named : ELEGANCE-V1-STABLE_Signed.zip
9. Let it install
10. Press back button and choose Reboot System Now!
11. Enjoy the Elegance™ ROM!

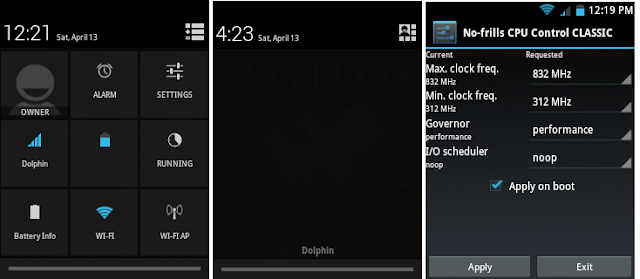
CPU Control Guide (Light Usage)
Min=156MHz
Max=624MHz
Governor= smartassV2 (recommended) or powersave
I/O Scheduler=Noop

Medium Usage
Min=156MHz
Max=832MHz
Governor= smartassV2
I/O Scheduler=Noop

Heavy Usage
Min=312MHz
Max=832MHz
Governor= Performance,Lionheart or smoothass
I/O Scheduler=Noop


Bugs :
Status bar Force closes sometimes,so need to reatart phone
LMT App force closes 

Overall :
A Good looking rom,far better than nemasis and other custom rom
Hyperion is good option but lacks android 4.2.2 status bar


Total Pageviews

DjKiRu Initative. Powered by Blogger.